Saturday, March 31, 2012

My March Favorites 2012

Well another month has come and gone. I have several products that have stood out above all the rest. These products are not in any particular order. These are the items that I used the most in the month of March. I feel that they deserve a pat on the back.
The first product that I liked alot and is a stand out. Is so inexpensive. This item is the Sephora precision pore cleansing pad. This handy little product is gentle on the face. It is really a great value for only $5. This little pink wonder cleans your face like nothing else. It also will leave it soft and smooth. Which is No. 1 in my book. I usually use my face sponge or Clarisonic to cleanse my face daily. But there are some days I just want to give my face a break. I now use my Clarisonic 3 times a week instead of everyday. I read somewhere that using it too much may cause premature wrinkling. If this is true who knows but, I don't want to be the first one to find out. Here is a little information on this wonder gizmo. It is a flexible silicone pad that gently massages the face and helps deliver a deep clean, radiant result. This pad has tiny bristles to invigorate the skin and clean pores, helping to exfoliate and soften the skin. This is available at www.sephora.com and at most Sephora stores.
The next product is the Lancome Teint Idole Ultra 24h SPF 15 foundation. This retails for $44 and can be found at just about any Department store that carries Lancome or at Sephora. This is my new miracle foundation. I really love how it applies and makes my skin look. It doesn't settle in my fine lines and doesn't transfer. It provides medium to full coverage with no more than one pump. It also has a velvety matte finish.  If you want to know more on this foundation I will be posting a review on it very soon. The color shown is in 210 Buff N.
My favorite tool is the Sigma F80 Flat Top Kabuki brush. This has been my go to brush for the last 8 months. I truly adore it. I even loved it so much that I purchased several as backups. This brush is so soft and dense that it really blends your foundation to an almost airbrush finish. Without streaking or removing the foundation as you blend. If you really want a good foundation brush for a great price then this is the one to get. It retails for $16 on Sigma's website www.sigmabeauty.com or you can get one on Ebay but, it may cost a little more. I feel that this is a great investment and with weekly cleaning and care this brush will last you for years to come. I will be doing an in depth review on my favorite brushes soon.
My favorite eye product is the Physician's Formula Nude Palette. This was a palette that was an impulse buy. I have a weakness for nude lipsticks, glosses and eye palettes. Why? Well I'm not sure maybe because they tend to look better on me than other colors do. Well this palette was purchased at Wal-mart for less than $10 dollars. I know that Ulta, Walgreen's and CVS carry it as well. I was watching a you-tube video by emilynoel83 and she was reviewing it. So I decided to buy it that same day. It is a winner it has great colors that blend well. I love the fact that it's so small and portable to carry everyday or to use while traveling. If you like nude eye shades or just like small cute palettes then check this one out.

Lastly the lip product that I adore lately. Is the EOS round lip balm in Sweet Mint. I really love this formula it glides on smoothly and lasts a long time. It feels cooling and hydrating at the same time on the lips. It comes in a cute round container. I got this one at Target for about $3. I also got two others a Lemon flavor and a Summer Fruit flavor. Well lets just say I like the sweet mint better. The other two weren't the same at least in my opinion. The lemon was too drying on the lips and the summer berry well the smell was awful. I couldn't stand it. As for the mint flavored one my cats seem to like it very well. To use as toy and also the smell and taste drives them wild. So when I wear it I have to be careful because they tend to stalk me. No really they do.

So these are my March favorites. If you have any questions or comments or want me to review any of these in depth then please email me or leave me a comment down below.


Thursday, March 29, 2012

My Easter Nail Creation 2012


 I started brainstorming for nail designs to do for Easter. This started last week for me and by yesterday had come to fruition. So with Easter just 10 days away. I got all my needed supplies to start this task. I will show you in someways how I did this nail design. I won't be going into a step by step process in photo's as this would have taken very long. I feel it's a simple enough design to create on your own without to much instruction.You will just need time and patience. I'm really excited with the final results.

I started off with painting my nails with a base coat. My preferred is Sally Hansen Insta-Grip Fast Dry Base Coat. Then I proceeded to paint my nails as followed. All using Sally Hansen Insta-Dri Fast Dry Nail Colors. Except on the thumb where I used Sally Hansen Complete Salon Manicure. Here are a list of those colors: Thumb-I Pink I Can, Pointer-Lightening, Middle- Jade Jump, Ring-Blue-Away and Pinkie-Raspberry Race.
Let's get started. On the pointer finger I used an orange acrylic paint to paint stripes towards the top and the other on the tip like a french manicure style. Then I used a green acrylic paint to paint a squiggle line between the two orange lines. Then added green dots on the top of the nail using a dotting tool. On the middle finger using a pink acrylic paint to paint a series of dots. Also using a dotting tool. On my ring finger I used a paint brush to paint with a brown acrylic paint a basket shape with a handle. Using the same french manicure method. Then added a handle using backwards "C" on top then connecting it to the sides of the basket. Then lastly on my pinkie I used an orange acrylic paint and a dotting tool to make two orange dots on top of the nail.
After that dried then I started working on my thumb area. I used a white acrylic paint and the dotting tool to create the bunny's backside. I made two dots with the bottom being a little bigger than the top. Then using the smaller end of the dotting tool. I made the ears. After that dried then I got a light pink acrylic paint and painted on a small tail using a brush. To make the grass I used a small brush and then used two acrylic paints in green. One light and one dark. I made the lighter strands first then added the darker later. To make the whiskers I used the small brush with a light grey acrylic paint.
Now on to the last two. For the Ring finger after the basket dries. I used orange, pink and yellow acrylic paint with the dotting tool to make the eggs. Then a small brush to make the designs on the eggs. After that dried then I used the small brush again to make the grass in the basket using the same method I described above. Then lastly I used a much darker brown acrylic paint to outline the basket. I used the small brush to make the basket weave and lines on the handle. As for the pinkie finger I used the small brush and yellow acrylic paint to paint on the lines four from each dot.
After all is said and done and dried. Then I used my preferred top coat coat Sally Hansen Insta-Dri Anti-Chip Top Coat. Be careful using a quick dry top coat of any brand. I have found that it will smear your design even if you think it's really dry. So beware.

I hope that you like this nail design. Maybe I should have just shown the pictures and not have described so much. So much for little instruction. Oh well.....maybe next time.

How to remove stubborn/glitter nail polish fast

Have you ever painted your nails with a wild glitter polish? Or even used a glitter polish as a top coat? I have and I can tell you it's a nightmare to remove. The solution? Well I'll tell you that in a minute. I have tried many things from soaking my nails in pure acetone. To soaking them in those nail polish jars with the sponge inside. Nothing worked well. It either took to long or irritated my nail beds from all the rubbing. So I found a great and easy solution to remove glitter or stubborn polish. One day last year while browsing the web as to find a better way to remove said polish. I discovered several ideas all using aluminum foil and cotton balls. So I decided to try this idea. Well it really worked.
 Here is what you need to do this. Any aluminum foil I got mine at the local grocery store. Scissors to cut the foil into 10 small sheets. Any nail polish remover and cotton balls or cotton pads. I love using the cotton pads personally and I feel are easier to use. I cut 3 cotton pads in 4's.
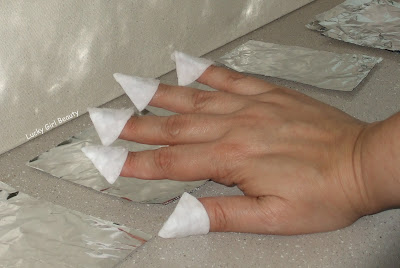
Then using the nail polish remover I put a good amount to saturate the pad. Then I placed all the pads on each of my fingers.
 Then using foil sheets I placed my finger on top and then folded it over the nail to seal it. Do that to all the nails on one hand then let set for 10 minutes or longer it's up to you. This may also depend on the type of glitter used and how many coats of polish you have on.
When time is up lightly twist the foil back and forth several times.
 Then pull from the nail revealing a clean polish free nail. If for some reason all the polish doesn't come off on the first try.Then just use a cotton ball/pad to clean off any excess left on the nail. Then proceed to doing the other hand in the same manner.
This can also be used on your toes as well to take off the polish in a easier way. Especially if you have problems like me bending for long periods of time.
This to me is the easiest way to remove polish without damaging your nail or cuticle area.

Tuesday, March 27, 2012

Spring Has Sprung Nail Design

Well with winter behind us. It now time for spring which begun March the 20th. I was trying to get used to time change earlier in the month. Which still has been a struggle. I was wanting to do a spring time nail design. So I was trying to decide on what to do. I was thinking flowers like many people do. Then I was thinking what kinds of flowers. I have always loved sunflowers and daisies. To me they are classic and delicate. So I chose on doing a daisy as my flower.

I also decided to incorporate a type of bug for my design. I tried ladybugs, dragonflies, butterflies and bees. I decided on doing a bee. I think a bee was going to be perfect. I could also do the dot/dash type lines that are associated with bee drawings. Well at least cartoon ones. I decided to place the bee on my thumb and the dash lines on the middle and pinkie fingers. The ring and pointer finger would have the daisies painted on them. 
So I started with my usual base coat.  Then I applied two coats of Sally Hansen Insta-Dri in Jade Jump.
Then using the yellow acrylic paint and a dotting tool.  I made two dots on both my pointer and ring finger on both hands.  Then using the white acrylic paint and a small brush I made the daisies petals. 
After that I then used the black acrylic paint and the dotting tool to paint the dots on my middle and pinkie fingers.  I did this on only one of my hands.  You could do them on both if you want to.
Then I used a dotting tool to make a yellow oval on my thumb nail using the yellow acrylic paint.  Then I applied two black stripes using the black paint.  I also did a V shape to create the stinger.  Behind the stinger I made 3 dots with the dotting tool.  Using a small paint brush I painted the wings. Then using the dotting tool I placed white paint in the wing area. When this dried I put a quick dry top coat to seal in all the nails. Also be careful when using a quick dry top coat as I did because it did smear some of my dot designs. I even let my paint dry 30 minutes.
This is a fairly simple and quick way to do cute spring nails.  I hope you enjoyed this tutorial.

Wednesday, March 21, 2012

Beautybox Five 2012~ My First impressions

On Tuesday I was delighted when checking my mail.  I received my newest monthly box subscription. Which is based in Greenville, Texas which is nice.  This is a homegrown beauty box company that goes by Beautybox Five.  This is a monthly sample service where for $12 a month you can receive 4-5 deluxe beauty items from different companies to try at home.  This was my first box ever from them as they launched last month for the first time.  You can subscribe to them monthly, quarterly or yearly.   
This is how the box comes it is a tad smaller than a Birchbox and MyGlam Bag mailer.  It is a beautiful turquoise color with brown and white accents on the front side.  The inside is filled with a dark brown confetti like filler.  Which is nice because this protects what's inside.
In the box were 6 samples.  One was a full-sized kajal eyeliner from a company named Lavera Naturkosmetik from Europe.  They have a North American website that ships within the US & Canada.  This liner is vegan and made with organic beeswax & organic palm oil.  I got this in color No. 2 which is a dark brown.  It retails for $15 and Eva Mendes apparently loves their line.  The other two items were a Day & Night Hydrating cream from Weleda in the scent Iris.  These were deluxe samples.  Also in the box was a deluxe sample of Pur-lisse pur-delicate gentle soy milk cleanser and makeup remover.  It says its for all skin types.  The last two items were in foil packets.  From Comodynes a self-tanner natural & uniform color tanning towelette.  Which is nice but, I'm not big on tanning I love being pale year round.  Then a soy nail polish remover wipe from Priti NYC infused with organic lemongrass essential oil.

Overall I really like all the items in my box. Can't wait to try these soon.  I will have to try some of these at a later date because I have tons of other samples to try and review.  Then I can come back with an honest review on these items.  The value of the box was a good one.  Its valued at around give or take $32.70. 

Tuesday, March 20, 2012

March Myglam Bag 2012

Last Tuesday I received my March MyGlam bag this was my third bag since subscribing to them in December.  In January I got my first bag and it was great I loved all the products.  Then in February I got my second bag which was OK not the best but, still good.  Then came this months bag and wow what a stinker.  Literally the bag came with this weird plastic smell I could barely stand it.  The bag was not what I expected.  The only two good things in the bag that I liked were.  A full sized 3Lab Perfect Cleansing foam in a 3.4 oz which retails for $50 but, the DermStore has it 20% off which makes it $40.  The other item was from a new company Karacolor they sent a color enhancing leave-in treatment sample pack which retails for $9.99 on their site.  Overall the bag was ok and retailed for around $55 which isn't bad.

This months bag was about repairing and restoring your skin & hair just in time for spring.  The other items in the bag were a small drawstring pouch containing what was called a DermStore care package this included: Pur-lisse Pur-protect SPF 30 Essential daily moisturizer & Murad Eye lift perfector & a DermStore $25 gift card which really wasn't a gift card it was a $25 off of a purchase of $50 or more what a ripoff.   A gift card is when you can get something for the amount shown and not have to pay extra unless you want to.  I really think that they should stop calling these gift cards.  Like last months NuMe $100 gift card which what not a gift card at all.  Every item on the site was expensive and you had to spend at least $40 dollars or more plus S&H just to use the $100 and only on select items to me that is not a savings.

The next part of the bag was the Foundational Elements this included one of 3 beauty basics to lay the groundwork for a fresh complexion.  So you were to get one of the following three products that were listed on the card.  Either a 3Lab perfect cleansing foam full-sized or a Pur-lisse Pur-lip comfort daily lip nourisher full-sized or a Murad Absolute bronzing boost SPF 15 deluxe sample.  Then a Karacolor enhancing leave-in treatment in natural.  Then a Myglam exclusive classic crease brush and case.  This brush was hand selected by Michelle Phan from her recent trip to Hong Kong and is exclusive.  Well my brush was terrible it had several hairs falling out from it.  And the little pink brush holder had an awlful scent coming from it a weird plastic smell which in turn made everything else smell that way. 

I'm still somewhat happy with my bag after all this is a $10 a month service and this includes shipping.  And the company is fairly new and still has alot of kinks to work out.  This includes the problems with shipping and with some glammies not getting their bags or getting them really late.  So far (knock on wood) I haven't had any of those issues with this company.  There are many on YouTube who have had issues and have voiced them & many who have cancelled their subscriptions because of the issues with billing and shipping.  I'm gonna stay with them for a while in hopes that they get better.  As with any new company there will always be some kinks along the way.  I hope that they are working hard to help resolve all these issues soon.

Tuesday, March 13, 2012

St. Patrick's Day Nail Art Tutorial

 I will show you step by step how to achieve this cute nail design for St. Patrick's Day. The following picture will show all the items used to create this.
Sally Hansen Insta-Grip Fast Dry Base Coat, Sally Hansen Xtreme in 110 Green with Envy, Sinful Colors in Call you Later, Kiss Nail Art Striper in Gold Glitter, Craft smart Acrylic paint in the colors Black and White and Sally Hansen Insta-Dri Anti-Chip Top coat.
Apply two coats of the Xreme wear in 110 Green with Envy over a base coat.
Then apply one coat of Sinful Colors in Call you Later.
Then using the black acrylic paint make a stripe over the nail.
Then using the white acrylic paint make a square over the black stripe let dry.
After that dries then using the Kiss striper in Gold glitter paint around the white with several coats till it covers all the white parts.  Then using a q-tip clean any areas of polish that may have gotten on the edges. Then make sure it's totally dry before the last step which is applying the top coat.
Now you are done. What cute nails to wear to a party or just out. I hope you enjoyed this tutorial.


Monday, March 12, 2012

My March Teen Vogue Birchbox 2012

Today was a great day I received my March Birchbox but, this was just not any box this was a special one.  This was the Teen Vogue box that was given if you opted in for it.  I was extremely excited to get it.  Even though I'm way passed the teen stages of age.  I still thought it would be fun to have it.  Vogue is very well known throughout the world & their aren't many who haven't heard of them.  I'm including several pictures of my box and what was in it.  Later on I will review these items to see how well I liked them or not.
In this box I received the following items.  Annick Goutal Petite Cherie Perfume in a sample size which says its a blend of fresh fruity notes & musk, this French fragrance is a definition of understated chic.  A full sized is $85.  The next item was Essie's luxeffects glittery top coat in A cut above which is a very hot pink glitter for placing onto any polish for an eye-catching look or even just wear it alone.  Full sized is $8. Which this was a full-sized item.  The next item was Shiseido Pureness Oil- Control blotting papers in a sample sized version of 20 sheets.  These mattifying tissues are coated with transparent rice powder to leave your skin shine-free. Full-sized is 100 sheets for $18.  The next item was a full sized version of Tarte LipSurgence Lip tint which this item I do already own in another color.  And really like it as well the color I got was amused and this is a very hot pink color.  This lip tint is a long-lasting stain that adds rich pigment & is designed to boost the moisture in your lips.   Full sized is $24.  The last item was a turquoise hairband by Twistband this comes in colorful snag-free elastics to give your ponytail a makeover.  12 pack is $18.  The other bonuses were a card for a discount of $10 off to Mod Cloth it says towards a fancy new frock for spring.  Then a card to subscribe to Teen Vogue 20 issues which is 2 years for $10.  Now that's a deal.  So far I'm very pleased with this months box & glad that I took a chance on it.  In all I got a great deal this month for $10.  I got two full-sized products worth a total of $32 for both.  And with the added items not including the extra bonuses.  The total worth of the box was valued at about $38.50 which was not that bad at all.  

The beginnings of a beauty blog

Hi,
This is my first attempt at doing a blog.  So please bare with me if it doesn't come out as I intended at first.  In this blog i'm going to talk about all things beauty mixed with some amazing finds and also some nail tutorials & anything else I find amusing.  I will try to post weekly and sometimes more often than that.  This will depend on what I find or have to show.  I'm really grateful for the opportunity to share the things I find to be meaningful in my day to day.  More to come~ stay tuned.